The best part of being a solo game developer is that you have full control over every aspect of your game. And the worst part of being a solo game developer is that you are responsible for every aspect of your game.
As a solo game developer myself, I often rely on assets from the Unreal Marketplace or websites like Mixamo, SketchFab, and CGTrader. You can get some great assets for free and many more if you pay.
But sometimes, you can’t find what you need at all, can’t afford it, or need to change it a bit to suit your needs. And that’s when you have to improvise like a pro – or as I like to call it, imPROvise! I’m a programmer first and foremost, but since I started working on my current project I’ve had to edit 3D models, animations, materials, textures, sounds… Thankfully, I enjoy all of those things and it’s been great to learn more about them, despite it being a bit overwhelming at times. And by practicing them, I’ve become better at collaborating and communicating with my friends and colleagues who actually do those things professionally. And who knows, maybe one day I could switch to one of those roles. They all seem like jobs I would enjoy. I wish I had enough time for all of them…
A few months ago, I added a Bomb Blueprint to my project. It was easy enough to find a good 3D model of a bomb, but I wanted my bomb to have an animated fuze that got shorter with time. A small detail that some players won’t even notice, but attention to detail is something that adds up in games, and can really impact their immersion. The asset didn’t come with any animations, so I had to resort to some clever material tricks! But before I talk about those tricks, I’d like to go through the basic structure of this blueprint.

In addition to the Static Mesh, it contains two SceneComponents and one ActorComponent (to those who are unfamiliar with Unreal: a SceneComponent has a transform and can be attached to other components, unlike an ActorComponent):
- BashableSphereComponent – represented by the red outline – It lets you use my Bash ability on this object from within that radius;
- SparkEmitter (ParticleSystemComponent), a pretty self-explanatory particle emitter. I probably should rename it to FireEmitter, though, since that’s the most noticeable part of the effect;
- HealthComponent: A component I created which keeps track of an Actor’s health and dispatches an event when it reaches zero.
But now let’s get to the material goodness I promised! This mesh uses two materials. One called “Metal1” (the main black part of the bomb), and another called “Fuze”. Originally, they shared the 4 textures below, but I ended up using only Base Color for the Fuze and removing the Normal Map from Metal1, which gave the bomb a simpler, cartoonier look.


But let’s focus on the Fuze material now. As I said earlier, I want the fuze to get shorter as the bomb gets closer to exploding. I can do that by setting its opacity (which requires changing the Blend Mode to translucent), gradually making it transparent, from the top of the fuze to its bottom (or right to left in the texture itself, which isn’t obvious by looking at it, but became apparent as I worked on the material). I’m gonna start by showing the finished material, and then I’ll break it down by nodes, using lots of images and videos. Sorry, mobile users, but I recommend using a desktop browser for this post!


Lerp (Linear Interpolation)
A Lerp returns a value between A and B, based on the value of an Alpha parameter (which is usually between 0 and 1). An Alpha of 0 results in A, an Alpha of 1 results in B, and so on. In the case of our Fuze material, it’ll take our Progress parameter (which I’ll update on every Tick) and convert it to a value between 0.5 and 0.2. Those last two values represent the visible length of the fuze along the texture’s horizontal axis.

Linear Gradient
A Linear Gradient returns two single-channel square textures. UGradient contains a horizontal gradient, and VGradient contains a vertical gradient. We’re only going to use the horizontal one for our Fuze. Its values change from 0 to 1 as you go from its left edge to its right edge. We’re gonna use that to our advantage in the next step.

Subtract
You can use this node to subtract entire textures from each other. In this case, I want to subtract the result of our Lerp from each pixel of our UGradient. Since the initial result of our Lerp if 0.5, this subtraction will cause the gradient to shift half of its width to the right. As the Lerp’s result goes down to 0.3, the gradient will gradually move back to the left, as you can see in the two short videos below.
| Plane Preview | Mesh Preview |
|---|---|

Sign
This one’s pretty simple. It’ll convert each pixel with a positive value to 1, negative values to -1, while keeping 0 values as 0. Since -1 in this context is the same as 0, this will make the texture transition from black to white without any in-between values.
| Plane Preview | Mesh Preview |
|---|---|

Multiply
Another very straightforward node. It’ll multiply each pixel by a specified value, which is -1 in this case. Now the part of the fuze that should be visible is white, and the part that has already been burnt is black, which is exactly what we need for the material’s Alpha channel.
| Plane Preview | Mesh Preview |
|---|---|

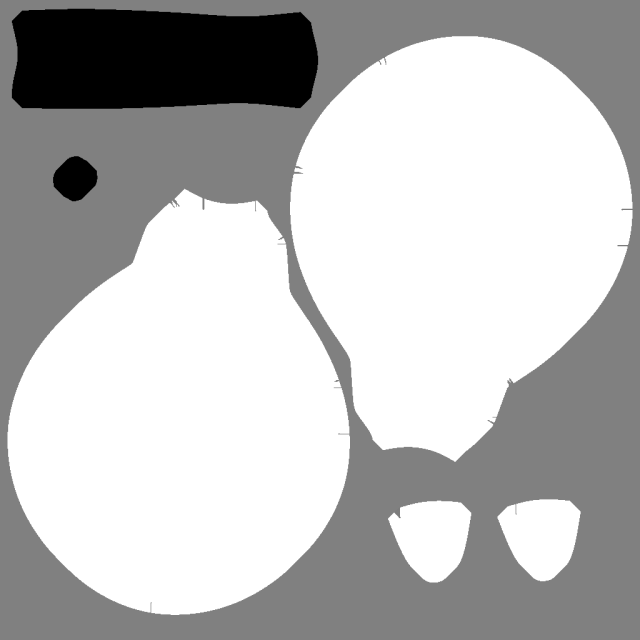
Wait a minute… Where did that white circle at the top of our fuze come from? That was already there before, actually. I was just hiding it with clever camera angles so I could talk about it now. 😬 Ideally, that white circle should move down, following the unburnt part of the fuze, but that would require using 3D animation software, which is what we were trying to avoid in the first place. Instead, we’re just gonna make it always invisible, since the hole will be covered by particles later, anyway. I edited the texture in Clip Studio Paint, making the top of the fuze transparent, as you can see in the screenshot to the right. The next node will take advantage of that.

Min
Returns a new texture consisting of the minimal values of A and B. Using our edited texture’s alpha channel as one input and our multiplied texture from the previous step as the other, the result is ready to be used as our material’s Opacity.
| Plane Preview | Mesh Preview |
|---|---|
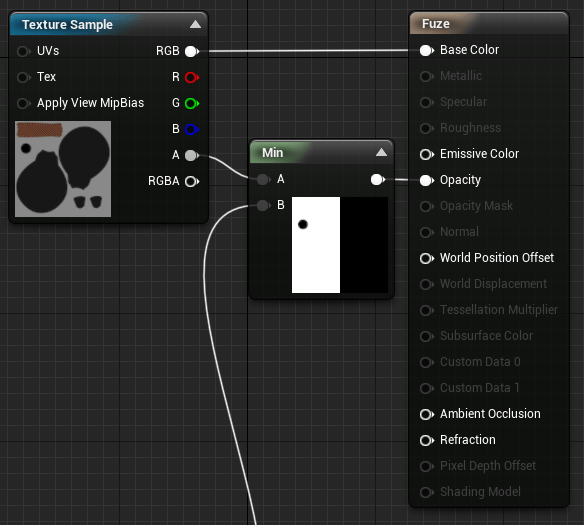
Main Material Node
And that’s it! The Texture Sample’s RGB channel will supply the Base Color, while the result of our Min node determines the opacity. Don’t forget that in order for the Opacity input parameter to be usable, you must first set your material’s Blend Mode to Translucent.
| Plane Result | Mesh Result |
|---|---|
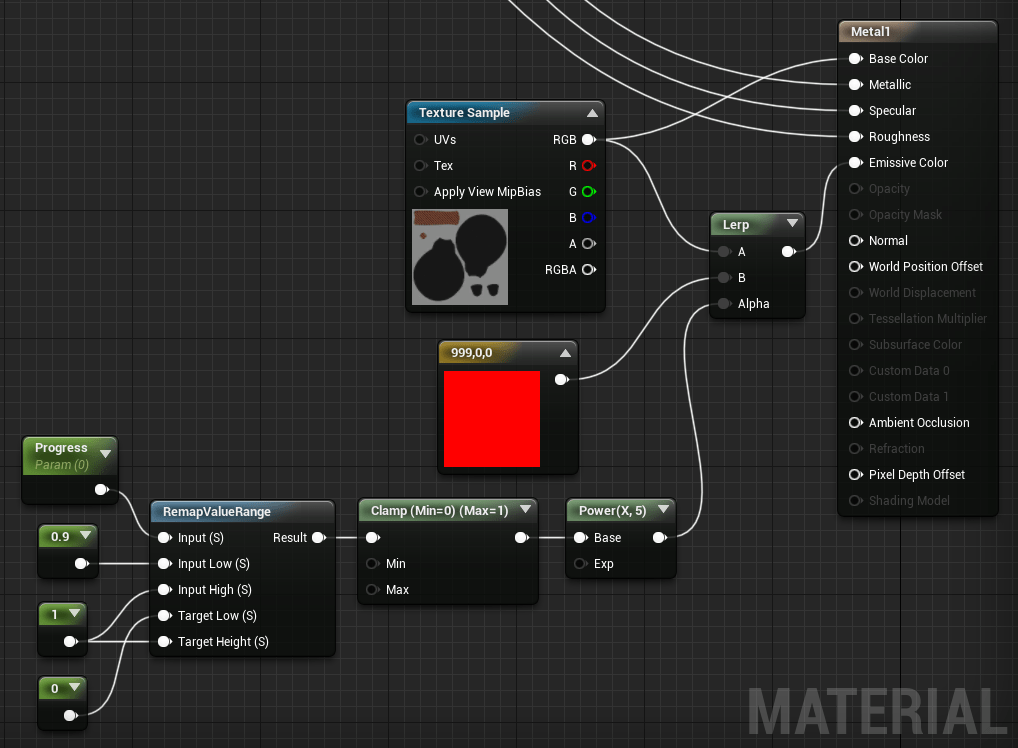
As for the Metal1 material, there’s only one thing I’d like to add. When the bomb is close to exploding, I want it to glow red as a warning. Glow effects are super easy to do in Unreal. You just need to set one or more of your RGB values to a number greater than 1. The higher the number, the brighter the light that it’ll shine.
I won’t be breaking this material down by node like the previous one, since it’s a lot more intuitive. It uses the same Progress parameter, but once it reaches 0.9, it’ll start to change the material’s Emissive Color to 999, 0, 0 (a.k.a. RED AS HECK :v). I didn’t have the Power(X, 5) node at first, but adding it made the effect a lot juicier, with a slow start and a healthy amount of acceleration.
Now that both materials are out of the way, it’s PARTICLE TIME! We need a fire particle for the fuze, as well as a nice explosion. I used “Par_TorchFire_01” and “Par_Meteora_Explode_01” from Luo’s Particle Toolkit Vol. 1, which I got for free thanks to Epic some time ago!
We can simply spawn an Explosion class – with an explosion emitter – at the center of the bomb after a certain amount of time has passed, and then destroy the bomb, which is pretty simple, but what about the fire particle that we want to use on the fuze? We have to make it follow the top of the fuze as it gets shorter. But we would need an animated socket for that, unless…
Unless we added multiple sockets and interpolated between them!
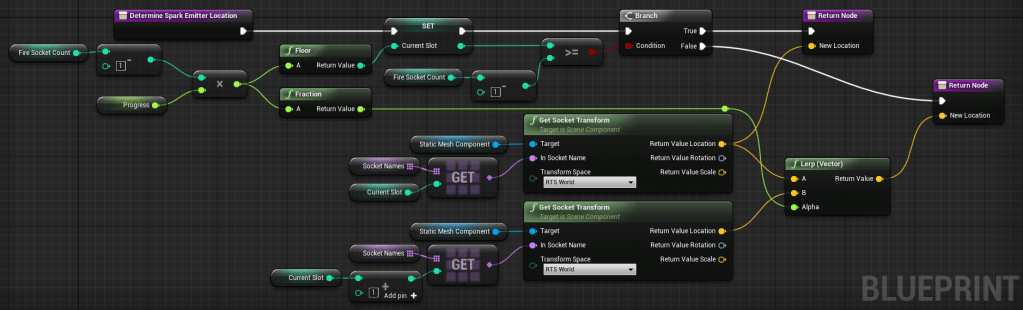
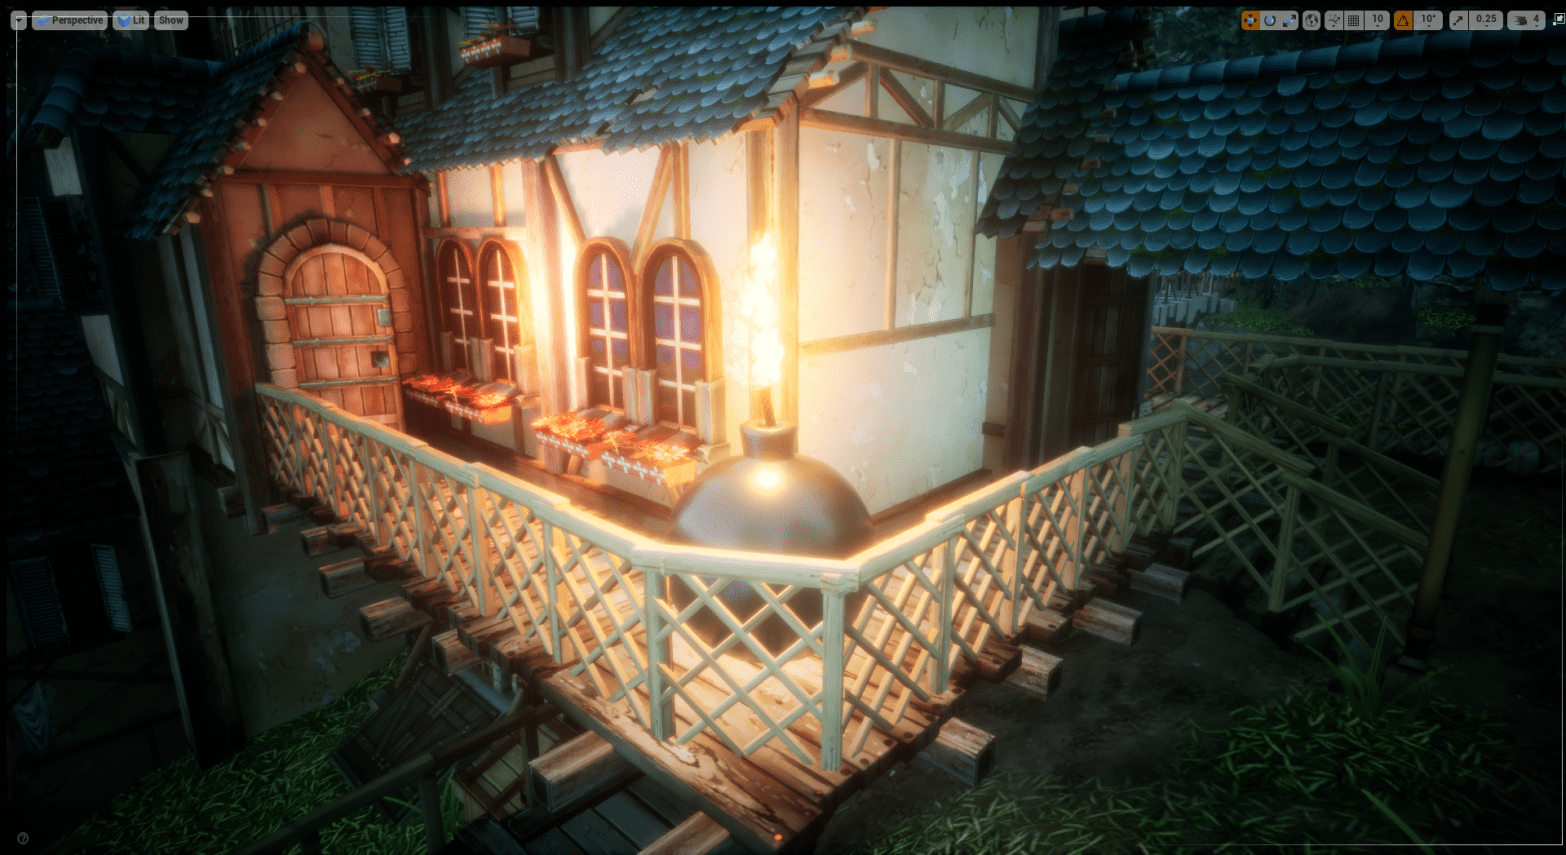
Here’s the result, showcased in a beautiful Watermill environment, which was also free a while ago! #ThanksEpic
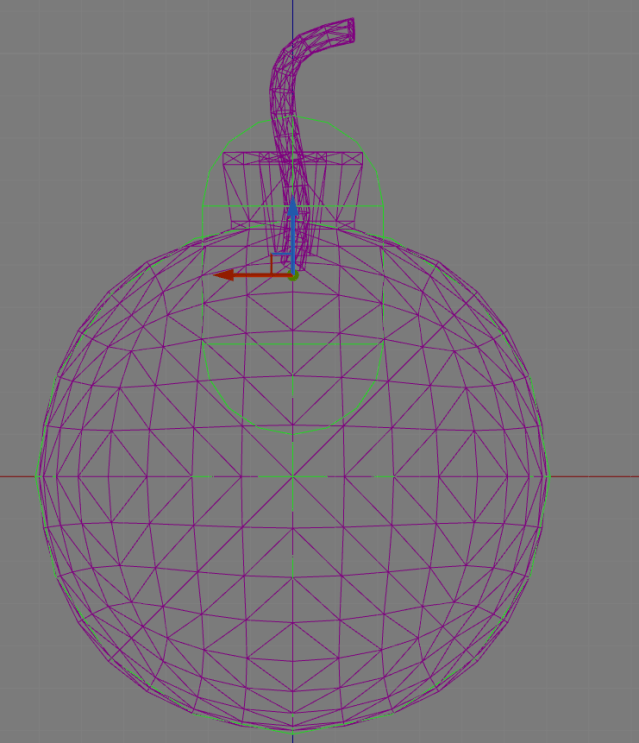
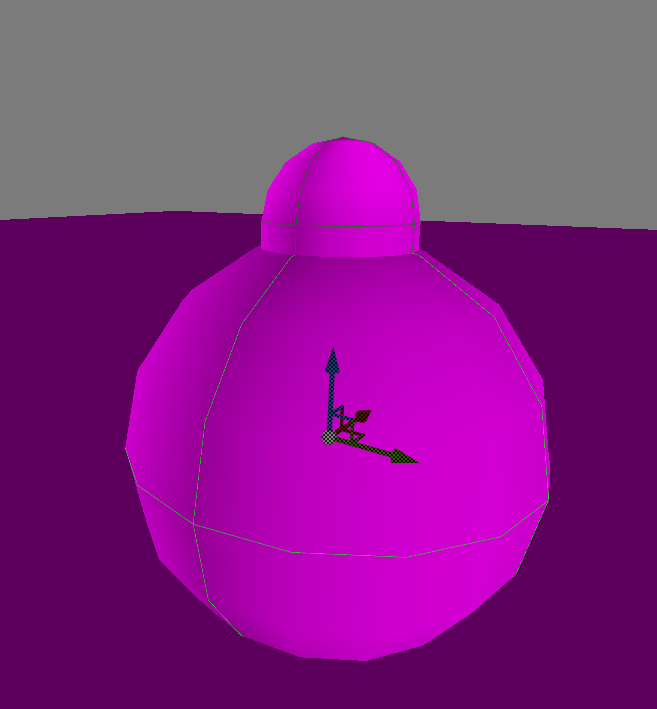
Now let’s talk about Collisions. I would like the bomb to be able to roll around smoothly and be pushed gently by the player, but also explode on contact when hit by a great force. Most of the time, I use Unreal’s Convex Decomposition feature to generate collision meshes, but this time I created one manually, since I knew exactly what I wanted. As you can see below, I added a collision sphere at the bomb’s center to make it roll smoothly, and a capsule near the extruded top part to stop the bomb from rolling over it.
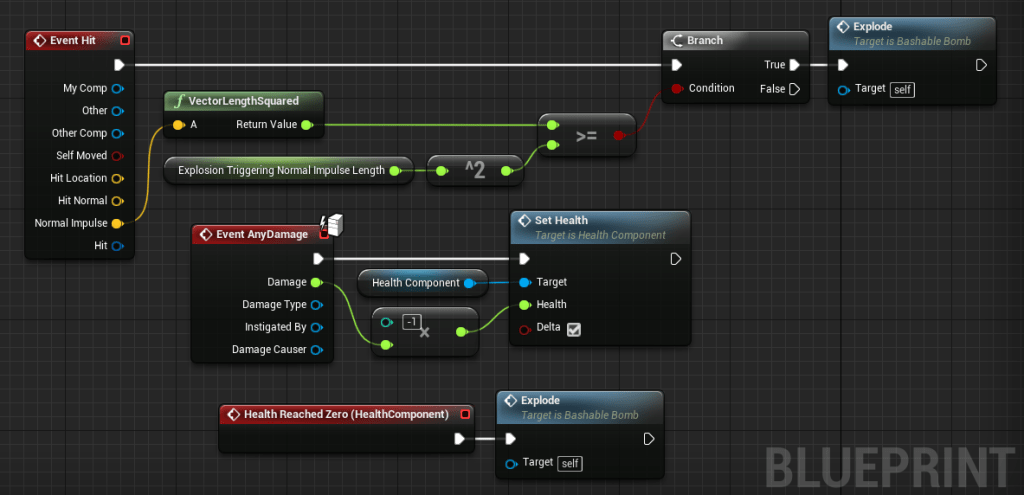
Sweet! Now, in order to make the bomb explode when it gets hit, we can use Unreal’s Hit Event, and compare the length of the Normal Impulse to a minimum expected value for exploding.
Now let’s test it out! Our character should be able to push the bomb and make it roll around smoothly without exploding, but if it got crushed by a giant anvil, it should definitely explode.
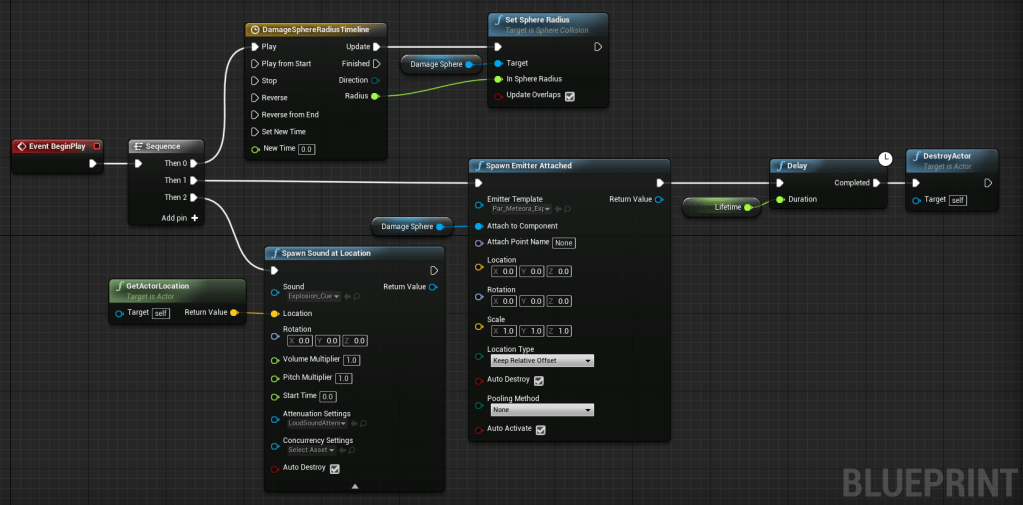
The last thing I would like to talk about is my Explosion system. As I briefly mentioned earlier, I spawn an explosion class when a bomb’s timer runs out. In addition to emitting a super cool explosion, that class also needs to apply damage to nearby objects. The easiest way to do that would be by using the Apply Radial Damage with Falloff node. It’s very customizable, with Inner and Outer radiuses, as well as damage values for each of them. However, it applies damage to every object within its reach at the same time, so if you had a line of multiple bombs and shot the first one, they would all explode simultaneously, instead of one by one in a chain reaction.
Which is why I made my own similar solution, with the addition of a Sphere Collision that keeps growing based on a Timeline, and damage only being applied when the ActorBeginOverlap event is invoked.

Now here’s our chain reaction:
And that’s it! There are some small things from the BashableBomb Blueprint that I didn’t think were worth covering, but if you’d like to check out the full EventGraph, I’ve shared the whole thing on BlueprintUE.com, so feel free to click here. It’s a pretty cool tool for sharing Blueprints easily, even if it messes up their alignment a little bit. Can you find an unused special effect in the EventGraph I shared? 👀 It’s something inspired by Bomberman, and even though I did get it to work, I ended up disabling it with a toggle, since it was affecting the gameplay in odd ways and looked a bit out of place.
I hope you had a blast reading this post! It’s been on my mind for a long time, but writing such a technical post took longer than I expected. I’m very happy with how it turned out, but please let me know what you thought of it! I’ll try to alternate between my usual showcase posts and more technical posts like this one.
My life has also been pretty busy, with a few big changes, but I’ve been keeping my goal of getting something done in Unreal every day. Since the time I showed you my 3D Bash mechanic, I’ve added tons of animations, sounds and a bunch of other improvements to my project, and I’m currently working on some parkour interactions. After those, I’ll probably add some cool weapons, and then some enemies with AI.

By the way, Epic has updated the Unreal Engine credits for version 4.24, and I’m mentioned as a Community Developer! I am so honored to be a part of this engine and have my username featured in the credits for everyone to see! And it’s one of the first names, too! I made a small contribution to version 4.23 (I fixed 13 typos in the Editor, because I’m obsessed with grammar), which got accepted earlier this year. A small beginning, but it’s insane to think that a few lines of code with my name attached to them are now part of this engine used by so many studios around the world, who are creating all sorts of fantastic things! And I also have a small list of other, more substantial, pull requests I’d like to submit in the future. Maybe I could even talk about some of them here, once I actually implement them.
I hope you guys are having Epic holidays and wish you an Unreal new year!

I’ll outright admit that the amount of time that I took to actually finish reading this article is criminally long, so very sorry for that. 😛
What’s not to love about this? There’s tons of implementation discussed with passionate attention to detail, there’s some great neat tricks explained, there’s lots of puns and jokes because it would not be an Agent Ottsel article without them… :V
But I’ll go on a tangent and say I’m impressed with how well a literal cartoon bomb meshes with those lush and realistic backdrops. That’s some impressive texture and shader work you got there.
Also, I’m not sure if you missed discussing that displacement that the bomb causes when it explodes or if that’s left as an exercise for the reader. ;D Either way, I love this and while I do know by experience how much work goes into an article like this, I hope to see more coming up. Your feed is definitely a welcome addition to my RSS Reader. 😀
LikeLiked by 1 person
Thank you so much for reading and being a follower, Guedes-san! I’m glad you enjoyed my post!
As for the cartoony bomb meshing well with the lush environments, I have UE4’s fantastic lighting to thank for that! 👀
This time the displacement effect came with the particle that I imported, but I did create a similar refractor effect that I use with Bash – the main difference is that this one looks more distorted and chaotic, which is fitting for an explosion, whereas mine favors visibility, so I went for a glass-like look. I think I’ll probably talk about it here at some point! 😀 You should check out Luos’ channel, he’s the author of the particle pack I used: https://www.youtube.com/user/vladderbeest
LikeLike