
Hey, everybody! I can’t believe it’s already been four months since I released the Crow Down Showdown demo! 😮 A huge thanks to everyone who has played it, sent me a nice comment or shared it with their friends! 😀
In this blog post, I will talk about one of the many cool things I developed for the game: My C++ Widget animation system! It’s gonna be a more technical post aimed at programmers, but everyone is welcome to read, just be warned that you might become one of us! I do not recommend, however, reading this from a phone, or you’ll have a bad time reading all the code! /o\
Still with me? Then let’s begin!
The first thing someone may think of when the see the words “Animation” and “C++” together is “wHy wOuLd AnYoNe UsE C++ fOr AnImAtIoNs WhEn YoU cAn CrEaTe ThEm ViSuAlLy WiTh KeYfRaMeS iN A TiMeLiNe?”. And while timelines are great when you want to play an animation that is exactly the same every time, if you need something dynamic, with parameters that affect your animation’s behavior, they’re not a very good fit for the job. And that is exactly what I needed to do for my “Objective complete” animation, which you can see below:

As you can see, the animation consists of multiple transitions where icons stylishly fly across the screen from the Current Obstacle Counter at the top towards the icon of the matching Finished Obstacle at the bottom. Both the start and end positions of each animation are dynamic, so using timelines would’ve required a lot of repetition to cover every possible case, and since I’m not insane (at least not in this context) I had to come up with a flexible solution using a custom Latent Action.
So what is a Latent Action? You’ve probably already used some of them! They are these fancy Blueprint nodes with a Clock symbol in their top right, indicating that at least one of their output execution pins will have a delayed response. Here are some examples:

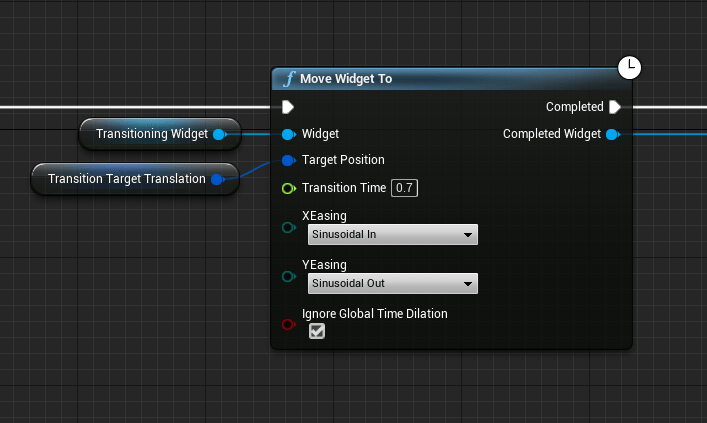
My plan was to create a Latent Action that could move a widget to a target position with a single Blueprint node, and then continue the execution once that animation was finished. Then, I could execute it for every widget that I would like to animate with different parameters. Before I explain how I did it, here’s a preview of what the final node looks like:

So how do you even make something like that? At first, I had no idea, but one of the best ways to learn how to do things in Unreal is by checking the engine’s source code!
Part 1: Learning from the Delay Node
Since the Delay node is the simplest Latent Action in Unreal, it was a great reference to learn how to make my own Latent Actions. By hovering over a Blueprint Node that was implemented in C++, you can see where its declaration comes from in the last line of the tooltip, after “Target is”.

So we are going on a fun trip to KismetSystemLibrary.h! A lot of global Blueprint nodes come from this file. Here’s what the Delay node’s declaration looks like:
/** * Perform a latent action with a delay (specified in seconds). Calling again while it is counting down will be ignored.
* * @param
WorldContext World context. * @param
Duration length of delay (in seconds). * @param
LatentInfo The latent action. */UFUNCTION(BlueprintCallable, Category
="Utilities|FlowControl", meta=
(Latent, WorldContext="WorldContextObject", LatentInfo
="LatentInfo", Duration=
"0.2", Keywords="sleep"))
static void
Delay(const
UObject*
WorldContextObject, float
Duration, struct
FLatentActionInfo LatentInfo);
Let’s break this declaration down! For now, we’ll ignore the UFUNCTION macro and go straight to basic C++.
- Like every other library function, it’s static.
UObject* WorldContextObjectis what allows us to get our current World, even though we don’t have an Actor to invokeGetWorld().float Durationis how long the Delay will last in seconds.struct FLatentActionInfo LatentInfocontains useful information that allows our Latent Action to behave as expected, as you will soon see in the function’s definition.
How come there are three parameters in the C++ function, but only one (Duration) in the Delay Blueprint node? That’s where the UFUNCTION macro comes in:
- UFUNCTION indicates that this function will be recognized by Unreal’s reflection system, which is required not only for Blueprints, but also other fancy things like delegate binding and network callbacks, which we’ll save for another time;
BlueprintCallableis pretty self-explanatory, as it allows this function to be called from Blueprints;Category="Utilities|FlowControl"helps make the function easier to find in the Blueprint Editor, which is always a good practice. The vertical slash (|) is used to create sub-categories, which is great for large libraries like this one!Latentdefines the node as a Latent Action (very important!);WorldContext="WorldContextObject"andLatentInfo="LatentInfo"let Unreal know which of our parameters will receive the relevant WorldContext and LatentInfo values, respectively. These parameters will be set automatically without showing up in our Blueprint node!Duration="0.2"simply gives the Duration parameter a default value;Keywords="sleep"means that Unreal will also suggest this function if you search for “sleep” in the Blueprint editor.
Let’s take a moment to read its definition:
void UKismetSystemLibrary::Delay(const UObject* WorldContextObject, float Duration, FLatentActionInfo LatentInfo){ if (UWorld* World = GEngine->GetWorldFromContextObject(WorldContextObject, EGetWorldErrorMode::LogAndReturnNull)) { FLatentActionManager& LatentActionManager = World->GetLatentActionManager(); if (LatentActionManager.FindExistingAction<FDelayAction>(LatentInfo.CallbackTarget, LatentInfo.UUID) == NULL) {
LatentActionManager.AddNewAction(LatentInfo.CallbackTarget, LatentInfo.UUID, new FDelayAction(Duration, LatentInfo)); }
}}Now we can see those parameters in action! WorldContextObject is used to get the current World, which is used to get a LatentActionManager. That Action Manager is then used to create and keep track of a new FDelayAction with the specified Duration, unless an Action with the same CallbackTarget and UUID (Universally Unique Identifier) already exists, which is what would happen if you called the same Delay node a second time before its first execution finished. If you’re curious, you can also check out the code for RetriggerableDelay, which is almost identical to this one, except it resets any existing FDelayAction’s TimeRemaining to the current value of Duration.
So far, our MoveWidgetTo function will be extremely similar to what we’ve seen. Just like the Delay function, it’ll need a Duration, WorldContextObject and LatentInfo, so it can create an Action and add it to the LatentActionManager. So what are these actions I keep mentioning, after all? Their full name is FPendingLatentAction, and they contain the Update logic that happens behind the scenes while you are waiting for your Blueprint node to finish executing.
Unreal’s Delay node uses its own subclass of FPendingLatentAction, which is called FDelayAction. Let’s check it out!
// Copyright Epic Games, Inc. All Rights Reserved.
#pragma once
#include "CoreMinimal.h"
#include "UObject/WeakObjectPtr.h"
#include "Engine/LatentActionManager.h"
#include "LatentActions.h"
// FDelayAction
// A simple delay action; counts down and triggers its output link when the time remaining falls to zero
class FDelayAction : public FPendingLatentAction
{public:
float TimeRemaining;
FName ExecutionFunction;
int32 OutputLink;
FWeakObjectPtr CallbackTarget;
FDelayAction(float Duration, const FLatentActionInfo& LatentInfo) : TimeRemaining(Duration) , ExecutionFunction(LatentInfo.ExecutionFunction) , OutputLink(LatentInfo.Linkage) , CallbackTarget(LatentInfo.CallbackTarget) { }
virtual void UpdateOperation(FLatentResponse& Response) override
{ TimeRemaining -= Response.ElapsedTime();
Response.FinishAndTriggerIf(TimeRemaining <= 0.0f, ExecutionFunction, OutputLink, CallbackTarget);
}
#if WITH_EDITOR
// Returns a human readable description of the latent operation's current state
virtual FString GetDescription() const override
{ static const FNumberFormattingOptions DelayTimeFormatOptions = FNumberFormattingOptions() .SetMinimumFractionalDigits(3) .SetMaximumFractionalDigits(3); return FText::Format(NSLOCTEXT("DelayAction", "DelayActionTimeFmt", "Delay ({0} seconds left)"), FText::AsNumber(TimeRemaining, &DelayTimeFormatOptions)).ToString(); }#endif
};
We can learn from this that our custom Action class will need these things:
- To inherit from
FPendingLatentAction; - A constructor that initializes any variables that my Action will need, including copies of some of
FLatentActionInfo‘s fields, so we can quickly access them later; - The following overridden functions:
void UpdateOperation(FLatentResponse& Response), where we run our update logic on every frame and notify when we are finished.FString GetDescription(), which is for debugging purposes and only exists when playing from the Unreal Editor. It would be a much shorter function if not for localization and formatting, but it’s still pretty simple.

Now that we know everything about how the Delay node works, we can finally start getting our hands dirty and implement our MoveWidgetTo node!
Part 2: First Implementation of MoveWidgetTo
The first thing we’re gonna need is a Library class where we can create our function and expose it to Blueprints. If you don’t have one of those yet, you can create one from the Unreal Editor by going to File > New C++ Class, and then selecting Blueprint Function Library as your parent class:

So here’s what an early version of the MoveWidgetTo function looked like in my BlueprintUtils.h file:
// BlueprintUtils.h
UFUNCTION(BlueprintCallable, Category = "Widget Transitions", meta = (Latent, WorldContext = "WorldContextObject", LatentInfo = "LatentInfo"))static void MoveWidgetTo(UWidget* Widget, const FVector2D TargetPosition, float TransitionTime, UObject* WorldContextObject, struct FLatentActionInfo LatentInfo);Not too different from Delay(). I renamed Duration to TransitionTime, added a pointer to a UWidget and an FVector2D TargetPosition, which should be enough for a simple transition. The final version had some extra parameters, which we’ll go back to later.
And here is its implementation, with some comments I added just for this post:
// BlueprintUtils.cpp
void UBlueprintUtils::MoveWidgetTo(UWidget* Widget, const FVector2D TargetPosition, float TransitionTime, UObject* WorldContextObject, struct FLatentActionInfo LatentInfo){ // Since we cannot move a Widget without a Widget, I added this
// null check below with an error message.
if (Widget == nullptr) { UE_LOG(LogTemp, Error, TEXT("MoveWidgetTo was called with a null Widget")); }
// The next 3 lines were copied from the Delay function and not changed at all.
if (UWorld* World = GEngine->GetWorldFromContextObject(WorldContextObject, EGetWorldErrorMode::LogAndReturnNull)) { FLatentActionManager& LatentActionManager = World->GetLatentActionManager();
// Unlike the Delay function, we don't need to check if an Action is already
// running on this node with LatentActionManager.FindExistingAction().
// If this node gets called a second time while it's already running, I want
// BOTH transitions to finish executing, not for the new one to be ignored,
// or for the old one to be interrupted. This allows me to iterate through
// multiple Widgets and animate all of them with a single MoveWidgetTo Node.
// Instead of creating an FDelayAction, we create an FMoveWidgetTransitionAction,
// a class which we'll implement in the next section.
FMoveWidgetTransitionAction* NewAction = new FMoveWidgetTransitionAction(
Widget,
TargetPosition,
TransitionTime,
LatentInfo
);
// Finally, we can add our fancy new Action to the LatentActionManager,
// and let it handle things from here!
LatentActionManager.AddNewAction(LatentInfo.CallbackTarget, LatentInfo.UUID, NewAction);
}}
Now let’s get to the most important part, the FMoveWidgetTransitionAction class!
#pragma once
#include "CoreMinimal.h"
#include "UObject/WeakObjectPtr.h"
#include "Engine/LatentActionManager.h"
#include "LatentActions.h"
#include <UMG/Public/Components/Widget.h>
#include <Vector2D.h>
#include "Kismet/KismetMathLibrary.h"
#include <Kismet/GameplayStatics.h>
// As previously mentioned, our class must be based on FPendingLatentAction.
class FMoveWidgetTransitionAction : public FPendingLatentAction
{public:
// Original parameters:
UWidget* Widget;
const FVector2D TargetPosition;
float Duration;
// New variables that we need:
const FVector2D InitialPosition; // We need to save the Widget's InitialPosition for Lerping purposes
float ElapsedTime = 0;
// Fields copied from LatentInfo:
FName ExecutionFunction;
int32 OutputLink;
FWeakObjectPtr CallbackTarget;
FMoveWidgetTransitionAction(UWidget* Widget, const FVector2D TargetPosition, float TransitionTime, const FLatentActionInfo& LatentInfo) : Widget(Widget) , InitialPosition(Widget->RenderTransform.Translation) , TargetPosition(TargetPosition) , Duration(TransitionTime) , ExecutionFunction(LatentInfo.ExecutionFunction) , OutputLink(LatentInfo.Linkage) , CallbackTarget(LatentInfo.CallbackTarget) { }
virtual void UpdateOperation(FLatentResponse& Response) override
{ // First, we update ElapsedTime, which is similar to
// what FDelayAction did with TimeRemaining, except
// we are adding Time instead of subtracting it.
ElapsedTime += Response.ElapsedTime();
// Now, we must determine the Widget's position for this frame,
// starting with a clamped alpha value for our interpolation.
float alpha = FMath::Clamp(ElapsedTime / Duration, 0.f, 1.f);
// Now we can interpolate between our widget's initial position and target position.
float x = UKismetMathLibrary::Lerp(InitialPosition.X, TargetPosition.X, alpha); float y = UKismetMathLibrary::Lerp(InitialPosition.Y, TargetPosition.Y, alpha);
// Finally, we can update our Widget's position! \o/
Widget->SetRenderTranslation(FVector2D(x, y));
// And let the Action be considered finished when (alpha >= 1).
// Because of our Clamp, alpha should never exceed 1, but it doesn't hurt
// to be a bit paranoid when working with float values.
Response.FinishAndTriggerIf(alpha >= 1.0f, ExecutionFunction, OutputLink, CallbackTarget);
}
#if WITH_EDITOR
// Returns a human readable description of the latent operation's current state.
virtual FString GetDescription() const override
{ static const FNumberFormattingOptions TransitionTimeFormatOptions = FNumberFormattingOptions() .SetMinimumFractionalDigits(3) .SetMaximumFractionalDigits(3);
// This function is mostly unchanged from FDelayAction. I just updated the strings
// below to say "MoveWidgetTransition" instead of "Delay", and replaced the TimeRemaining
// variable with (Duration - ElapsedTime), which is effectively the same thing.
return FText::Format(NSLOCTEXT("FMoveWidgetTransitionAction", "MoveWidgetTransitionActionTimeFmt", "Move Widget Transition ({0} seconds left)"), FText::AsNumber(Duration - ElapsedTime, &TransitionTimeFormatOptions)).ToString(); }#endif
};If you’ve manage to follow everything so far, congrats! You can already use this knowledge to create your own Widget transitions with Latent Actions!
Part 3: Refinements
What if I told you that what we’ve done so far isn’t good enough yet? What would you add to our functions and FMoveWidgetTransitionAction class to make them even better?
First of all, our transition is completely linear, which is not juicy at all. Do you know how we could easily fix that? Exactly! With an easing function. We could even expose that parameter to our Blueprint node for maximum customization. But do you know what’s better than one easing function? TWO easing functions! Why? So we can have one for each axis, creating all sorts of interesting combinations! Trust me, you’re gonna love this! 👀

EEasingFunc::Type enum you get a cool dropdown selector in your Blueprint node! We need to add these two parameters to our MoveWidgetTo function: EEasingFunc::Type XEasing and EEasingFunc::Type YEasing:
UFUNCTION(BlueprintCallable, Category = "Widget Transitions", meta = (Latent, WorldContext = "WorldContextObject", LatentInfo = "LatentInfo"))static void MoveWidgetTo(UWidget* Widget, const FVector2D TargetPosition, float TransitionTime, const EEasingFunc::Type XEasing, const EEasingFunc::Type YEasing, UObject* WorldContextObject, struct FLatentActionInfo LatentInfo);Then, by doing the same thing we did with our other parameters (passing them to our FMoveWidgetTransitionAction constructor, which then copies them to a variable), we can finally replace this part of our UpdateOperation function:
float x = UKismetMathLibrary::Lerp(InitialPosition.X, TargetPosition.X, alpha);float y = UKismetMathLibrary::Lerp(InitialPosition.Y, TargetPosition.Y, alpha);with this:
float x = UKismetMathLibrary::Ease(InitialPosition.X, TargetPosition.X, alpha, XEasing);float y = UKismetMathLibrary::Ease(InitialPosition.Y, TargetPosition.Y, alpha, YEasing);Let me show you a comparison of what my animation looked like before and after replacing Lerp with Ease, as well an alternative version with different parameters:
This is equivalent to using a Linear easing for both axes.
YEasing = Sinusoidal In
By using different easing functions for each axis, we can create nice curved movements like this!
YEasing = Sinusoidal Out
This is the one that I ended up using! I really like how it looks!
Now what if I wanted to do something to a widget after its transition finished? Since I am iterating through multiple Widgets and animating all of them with a single MoveWidgetTo node, I need to know which Widget just finished animating when the Completed execution output pin is triggered. In my case, so I can delete it and not end up with multiple copies of the same widget in the same target location. If we assume that every widget has the same transition time, we could just iterate through the same widgets to know which one just finished animating. Although that would work on this case, it wouldn’t be a very reliable way to know which widget finished animating. Thankfully, we can add an output node to do exactly that for us!
So do we just make the MoveWidgetTo C++ function return something instead of nothing? That wouldn’t work, since it would return the widget as soon as the function finished executing, *not* when the animation actually finished, which depends on the Latent Action we created.
But there is another way! When working with C++ functions exposed to Blueprints, any parameter with the Reference (&) character becomes an output node (which is what allows us to have multiple output pins in the first place).
So all we need to do is add a UWidget*& CompletedWidget parameter to our function, and the Blueprint node will get a UWidget* output pin… We can use this reference to set that output value whenever we want!
UFUNCTION(BlueprintCallable, Category = "Widget Transitions", meta = (Latent, WorldContext = "WorldContextObject", LatentInfo = "LatentInfo"))static void MoveWidgetTo(UWidget* Widget, UWidget*& CompletedWidget, const FVector2D TargetPosition, float TransitionTime, const EEasingFunc::Type XEasing, const EEasingFunc::Type YEasing, UObject* WorldContextObject, struct FLatentActionInfo LatentInfo);So we pass the CompletedWidget reference to our FMoveWidgetTransitionAction, where it’ll be copied to another variable of the same type and name…
FMoveWidgetTransitionAction* NewAction = new FMoveWidgetTransitionAction(
Widget,
CompletedWidget,
TargetPosition,
TransitionTime,
XEasing,
YEasing,
LatentInfo
);And finally, we update CompletedWidget right before the transition is finished at the end of the UpdateOperation function:
virtual void UpdateOperation(FLatentResponse& Response) override
{ // ...
if (alpha >= 1.f) { CompletedWidget = Widget;
}
Response.FinishAndTriggerIf(alpha >= 1.0f, ExecutionFunction, OutputLink, CallbackTarget);
}References are really useful, huh? Check out the added “Completed Widget” output pin in the screenshot below:

If your game messes with time dilation for slow-motion effects, you may or may not want your widget transitions to be affected by the global time dilation. The DeltaTime you get from FLatentResponse’s ElapsedTime() in the UpdateOperation function is influenced by the current global time dilation, so if you want to compensate for that, you have to divide ElapsedTime() by the time dilation, like this:
// I went ahead and added this variable here and in the MoveWidgetTo function to toggle this new behavior.
if (bIgnoreGlobalTimeDilation)
{ float timeDilation = UGameplayStatics::GetGlobalTimeDilation(Widget->GetWorld()); ElapsedTime += Response.ElapsedTime() / timeDilation; // timeDilation must not be zero!
}else
{ ElapsedTime += Response.ElapsedTime();
}And that’s it! Now we have a much improved MoveWidgetTo Blueprint node, which we can use in all sorts of animations:
While I used this node for my Obstacle Class Completed animation, which is something very specific to my game, a lot of games have similar animations when you complete a certain objective and a bunch of collectibles fly across the screen (whether they are Wumpa fruits, lives, gems, coins, or whatever).
Not only that, but we’ve seen what a powerful tool Latent Actions can be, and I hope this post may have served as a nice introduction to them! We’ve only really scratched the surface of what you can do with them, so the next time you see a cool Latent Node (perhaps a more complex one, with multiple output execution pins), be sure to check its source code to see how it works! Curiosity is on your side!
Since I didn’t want this post to get super long, I skipped some of the repetitive tasks like adding variables to FMoveTransitionAction and its constructor while explaining these refinements, but if you’d like to review or copy the finished versions of my functions and classes, I’ve pasted them below in their full glory. Just don’t forget to check the bonus section after them! 👀
// BlueprintUtils.h
UFUNCTION(BlueprintCallable, Category = "Widget Transitions", meta = (Latent, WorldContext = "WorldContextObject", LatentInfo = "LatentInfo"))static void MoveWidgetTo(UWidget* Widget, UWidget*& CompletedWidget, const FVector2D TargetPosition, float TransitionTime, const EEasingFunc::Type XEasing, const EEasingFunc::Type YEasing, bool bIgnoreGlobalTimeDilation, UObject* WorldContextObject, struct FLatentActionInfo LatentInfo);// BlueprintUtils.cpp
void UBlueprintUtils::MoveWidgetTo(UWidget* Widget, UWidget*& CompletedWidget, const FVector2D TargetPosition, float TransitionTime, const EEasingFunc::Type XEasing, const EEasingFunc::Type YEasing, bool bIgnoreGlobalTimeDilation, UObject* WorldContextObject, struct FLatentActionInfo LatentInfo){ if (Widget == nullptr) { UE_LOG(
LogTemp, Error, TEXT("MoveWidgetTo was called with a null Widget")); }
if (UWorld* World = GEngine->GetWorldFromContextObject(WorldContextObject, EGetWorldErrorMode::LogAndReturnNull)) { FLatentActionManager& LatentActionManager = World->GetLatentActionManager();
FMoveWidgetTransitionAction* NewAction = new FMoveWidgetTransitionAction(
Widget,
CompletedWidget,
TargetPosition,
TransitionTime,
XEasing,
YEasing,
bIgnoreGlobalTimeDilation,
LatentInfo
);
LatentActionManager.AddNewAction(LatentInfo.CallbackTarget, LatentInfo.UUID, NewAction);
}}// MoveWidgetTransitionAction.h
#pragma once
#include "CoreMinimal.h"
#include "UObject/WeakObjectPtr.h"
#include "Engine/LatentActionManager.h"
#include "LatentActions.h"
#include <UMG/Public/Components/Widget.h>
#include <Vector2D.h>
#include "Kismet/KismetMathLibrary.h"
#include <Kismet/GameplayStatics.h>
class FMoveWidgetTransitionAction : public FPendingLatentAction
{public:
UWidget* Widget;
UWidget*& CompletedWidget;
const FVector2D InitialPosition;
const FVector2D TargetPosition;
float Duration;
float ElapsedTime = 0;
EEasingFunc::Type XEasing;
EEasingFunc::Type YEasing;
bool bIgnoreGlobalTimeDilation;
FName ExecutionFunction;
int32 OutputLink;
FWeakObjectPtr CallbackTarget;
FMoveWidgetTransitionAction(UWidget* Widget, UWidget*& CompletedWidget, const FVector2D TargetPosition, float TransitionTime, EEasingFunc::Type XEasing, EEasingFunc::Type YEasing, bool bIgnoreGlobalTimeDilation, const FLatentActionInfo& LatentInfo) : Widget(Widget) , CompletedWidget(CompletedWidget) , InitialPosition(Widget->RenderTransform.Translation) , TargetPosition(TargetPosition) , Duration(TransitionTime) , XEasing(XEasing) , YEasing(YEasing) , bIgnoreGlobalTimeDilation(bIgnoreGlobalTimeDilation)
, ExecutionFunction(LatentInfo.ExecutionFunction) , OutputLink(LatentInfo.Linkage) , CallbackTarget(LatentInfo.CallbackTarget) { }
virtual void UpdateOperation(FLatentResponse& Response) override
{ if (bIgnoreGlobalTimeDilation)
{
float timeDilation = UGameplayStatics::GetGlobalTimeDilation(Widget->GetWorld()); // Global time dilation must not be zero!
ElapsedTime += Response.ElapsedTime() / timeDilation;
}
else
{
ElapsedTime += Response.ElapsedTime();
}
float alpha = FMath::Clamp(ElapsedTime / Duration, 0.f, 1.f);
float x = UKismetMathLibrary::Ease(InitialPosition.X, TargetPosition.X, alpha, XEasing); float y = UKismetMathLibrary::Ease(InitialPosition.Y, TargetPosition.Y, alpha, YEasing);
Widget->SetRenderTranslation(FVector2D(x, y));
if (alpha >= 1.f) {
CompletedWidget = Widget;
}
Response.FinishAndTriggerIf(alpha >= 1.0f, ExecutionFunction, OutputLink, CallbackTarget);
}
#if WITH_EDITOR
// Returns a human readable description of the latent operation's current state
virtual FString GetDescription() const override
{ static const FNumberFormattingOptions TransitionTimeFormatOptions = FNumberFormattingOptions() .SetMinimumFractionalDigits(3) .SetMaximumFractionalDigits(3);
return FText::Format(NSLOCTEXT("FMoveWidgetTransitionAction", "MoveWidgetTransitionActionTimeFmt", "Move Widget Transition ({0} seconds left)"), FText::AsNumber(Duration - ElapsedTime, &TransitionTimeFormatOptions)).ToString(); }#endif
};Bonus: My Blueprint Animation Setup
While this post was focused on the C++ side of things, in case any of you are curious about how exactly I used the MoveWidgetTo node in Blueprints for my Obstacle Class Completed animation, I didn’t want to leave you wondering, so click here to open a full-sized screenshot of what the entire Macro for that looks like (plus a bonus function to get a Widget’s position relative to another widget!). It’s a pretty wide image, so it may take a while to load! I was going to use BlueprintUE.com to share them, but it messed with the formatting a bit too much this time, so I thought a screenshot would be better. I used the Graph Printer plugin, by the way, which is free in the Unreal Marketplace. No, they are not the sponsor of today’s blog post. I genuinely think it’s a great plugin, but YOU can be my sponsor if you want, by supporting me on Ko-fi by clicking on the big blue button which you can find at the bottom of this page.
PS: If anyone knows a good way to share C++ widgets with syntax highlighting in HTML, please let me know! I didn’t like WordPress’ SyntaxHighlighter block since it didn’t highlight much and only had a light theme, so I ended up pasting my code into VS Code, copying it with syntax highlighting to Microsoft Word, saving it as HTML, and then embedding each snippet in a custom HTML block (which also required some CSS changes). It worked and I like how it ended up looking, but it is a pretty annoying process to go back and edit things now, so I would like to find a better solution for the next time I share C++ in a post.
Thank you for reading, and stay Epic, my friends! :v
